 5-Star Rating!
Premium 1954-1955 VW Beetle Convertible Carpet Kit - Front - w/o Footrest - German Squareweave


- Description
-
Fits Years
-
TechTips
- Shipping & Returns
- Q&A
- Shipping & Returns
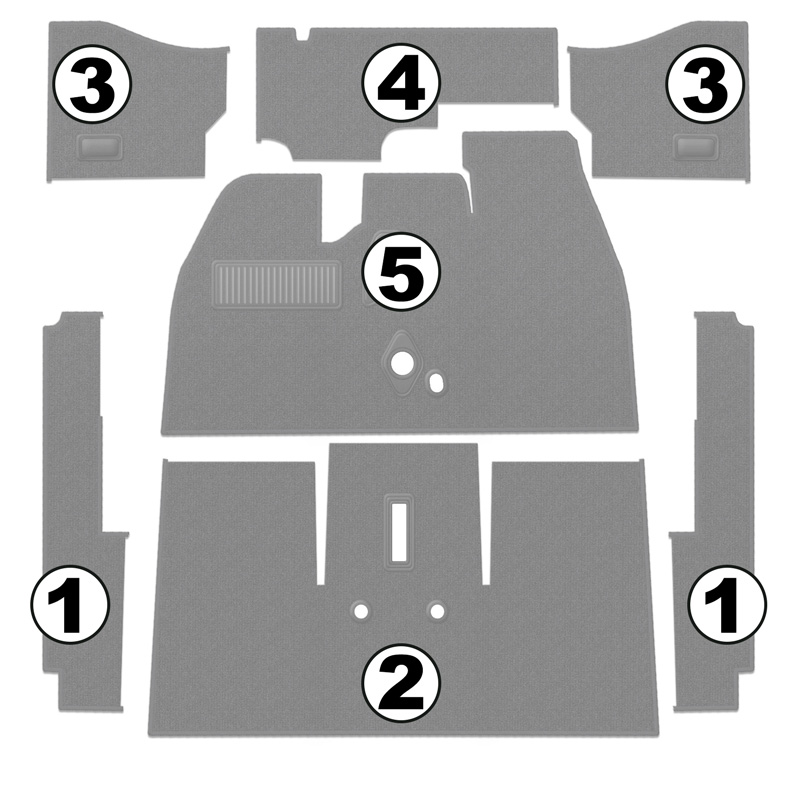
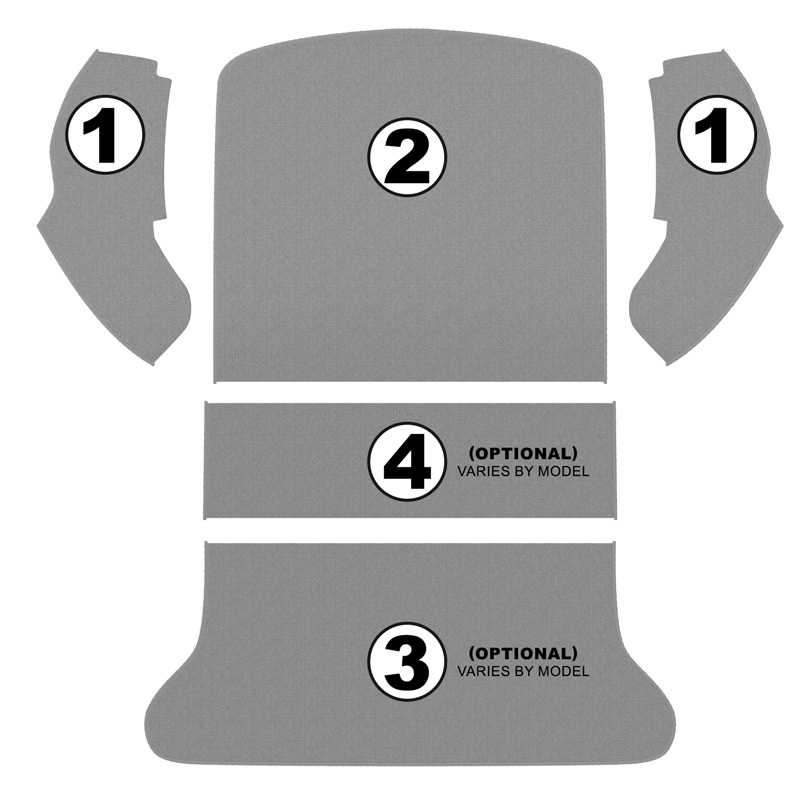
This Premium Carpet Kit is compatible with the 1954-1955 VW Beetle Convertible. This carpet kit is German Squareweave (the original German designed VW Carpet) and is for use without a footrest made of high quality, automotive grade components designed to withstand years of use and continue to look great. Our Premium Carpet Kits include pre-cut grommets for gear shift, emergency brake boot, and heater control knob for easy installation. Our carpet kits cover the passenger area from the base of the rear seat to and including the front. All front carpet kits also include a heavy-duty vinyl heel pad under the pedals. The carpet kit is yarn bound on all exposed (viewable) edges. Choose from a variety of colors.
Colors Available:

Color Swatches are close approximations, but may appear different on your screen than in person. To ensure you are completely satisfied with the color you order, we recommend ordering a free color sample so you can view and match the color in person before purchasing.
This front carpet kit includes matching yarn binding, driverâÂÂs side heal padding, pre-cut grommets for gear shift, emergency brake boot, and heater control knob. Front carpet kits cover the interior compartment up to the rear seat. Our carpet kits feature rubber backing and are bound with yarn.
1954-1955 VW Beetle carpets are made to order. It is custom made for you once we receive your order.
California Prop 65 Warning: Cancer and Reproductive Harm
Please Note:The information listed below is for stock, unmodified VW's manufactured for sale in the US. VW's are commonly modified and very often parts from another year VW may have been installed on your car. California Pacific JBugs is not responsible for any errors if your car has been modified in any way.
VW Beetle
Convertible
1954 - 1955
General Installation Guide for Beetle/Super/Ghia Carpet Kits.
Before installing carpet, remove front & rear seats. Remove all carpet and rubber mats. DO NOT REMOVE ANY OF THE INSULATION MATERIAL GLUED TO THE FLOOR PAN OR TUNNEL UNLESS YOU ARE INSTALLING NEW INSULATION OR SOUND DEADENER. Clean and vacuum interior.If installing a Standard Carpet kit:(Beetle & Super only)
Remove stick shifter and emergency brake rubber to cut holes for the shifter lever, heater control and floor vents on all models. Use old carpet as a pattern for hole locations. If old carpet is unusable, then lay new carpet against where holes are to be cut and use as a pattern. Lay all pieces in place before gluing to check fit and position of all carpet pieces.
If installing a Premium Carpet kit:(Beetle & Super only)
Premium Carpet Kits are pre-cut so no trimming is typically required.
TEST FIT THE CARPET BEFORE GLUING THE CARPET IN PLACE!
We have seen countless cars with the wrong repair parts used, different floor pans and even replacement chassis used with different bodies. TEST FIT THE CARPET BEFORE INSTALLING!
1) Start with door sills at the door edge trim and lay the carpet in towards the center of the car.
2) Next glue both driver and passenger kick panel pieces. Start at the top and work down. (pre 68 models: be sure to line up the heater grommet).
3) Then glue in the front firewall section.
4) Install the rear floor and tunnel pieces. Start from the tunnel and work out to each of the doors. 5) Finally glue the front tunnel piece by starting from the tunnel and working out to each of the doors.
**Please Note: Whenever we install carpets our preferred gluing method is to spray back on the carpet and car floor. Then once glue is sticky, tack both pieces together.
Shipping
We offer FREE SHIPPING on orders over $100*Orders under $100 cost a flat-rate, $9.95*
*Continental United States only.
If you need express shipping, please call us for expedited shipping options. We will try to consolidate as much as possible to offer the lowest shipping rates.
Alaska, Hawaii, Puerto Rico, APO/FPO, & US TerritoriesFor orders to Hawaii, Alaska, APO/FPO, Puerto Rico and other US territories, we will provide you with your shipping options and the costs via phone. The shipping costs for these orders are billed at the time of shipping.
International ShippingWe do not ship internationally. We only ship to the USA and it's territories.
Returns
90 Day Return PolicyYou can return most unused, never installed, like-new items for 90 days from the date of receipt. Items must be in like-new condition.
The following items are final sale:
- Special order items
- Special order upholstery
- Electrical items
- Installed carburetors
{{ totalQuestions }}{{ (totalQuestions === 1) ? ' Question' : ' Questions' }} with {{ totalAnswers }}{{ (totalAnswers === 1) ? ' Answer' : ' Answers' }}
Ask a Question
Question
Name
Email
Submit Question
A confirmation email will be sent to your email address before your question can be posted.
Success!
Uh Oh
Page {{ currentPage }} out of {{ totalPages }}
{{ question.asker.display_name }}
QUESTION{{ textDecode(question.content) }}
{{ answer.answerer.display_name }}
Store Owner
COMMUNITY ANSWER
{{ textDecode(answer.content) }}
Page {{ currentPage }} out of {{ totalPages }}
These parts help you finish the job:
Recently Viewed Items:
{{ totalReviews }} Customer {{ (reviewCount === 1) ? 'Review' : 'Reviews' }}, {{ reviewAverage }} Average Score
Filter by Rating:
Page {{ currentPage }} out of {{ totalPages }}
{{ review.user.display_name }}
Verified Purchase
{{ formatDate(review.created_at) }}
{{ textDecode(review.content) }}
Oops, looks like we don't have any reviews with this rating.
Oops, looks like we don't have any more reviews with this rating.
Page {{ currentPage }} out of {{ totalPages }}
