Hand Brake or Parking Brake?

Both terms are used interchangeably in the VW community. However, period correct VW manuals refer to the hand lever section as the "Hand Brake" and the mechanism in rear brake hubs as the "parking brake".
Normal Operation:
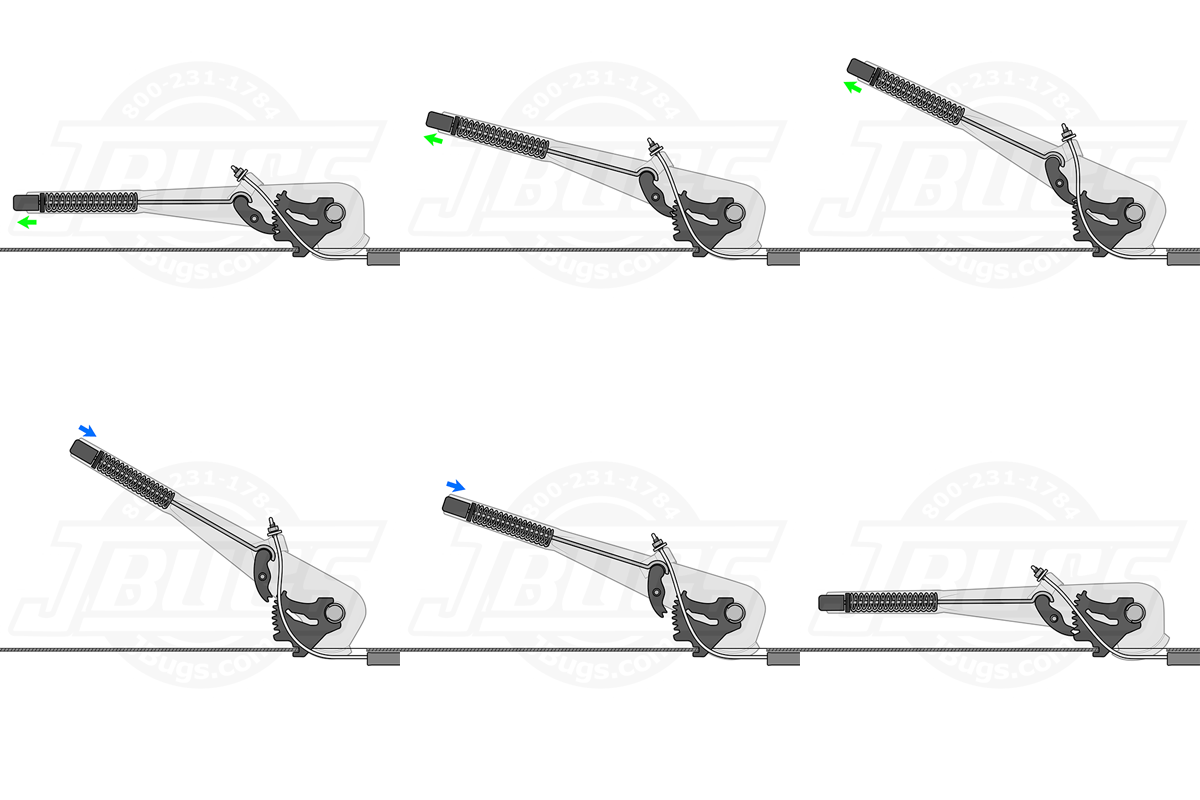
When the handbrake lever is pulled upward, the pawl engages with the stationary ratchet plate, holding the lever in place. The return spring keeps the pawl engaged until the release button is pressed. As the lever is raised, the left and right parking brake cables are tensioned. This action mechanically applies the rear brake shoes inside the brake drums, holding the vehicle stationary.
VW Hand Brake Parking Brake pop-out Animation
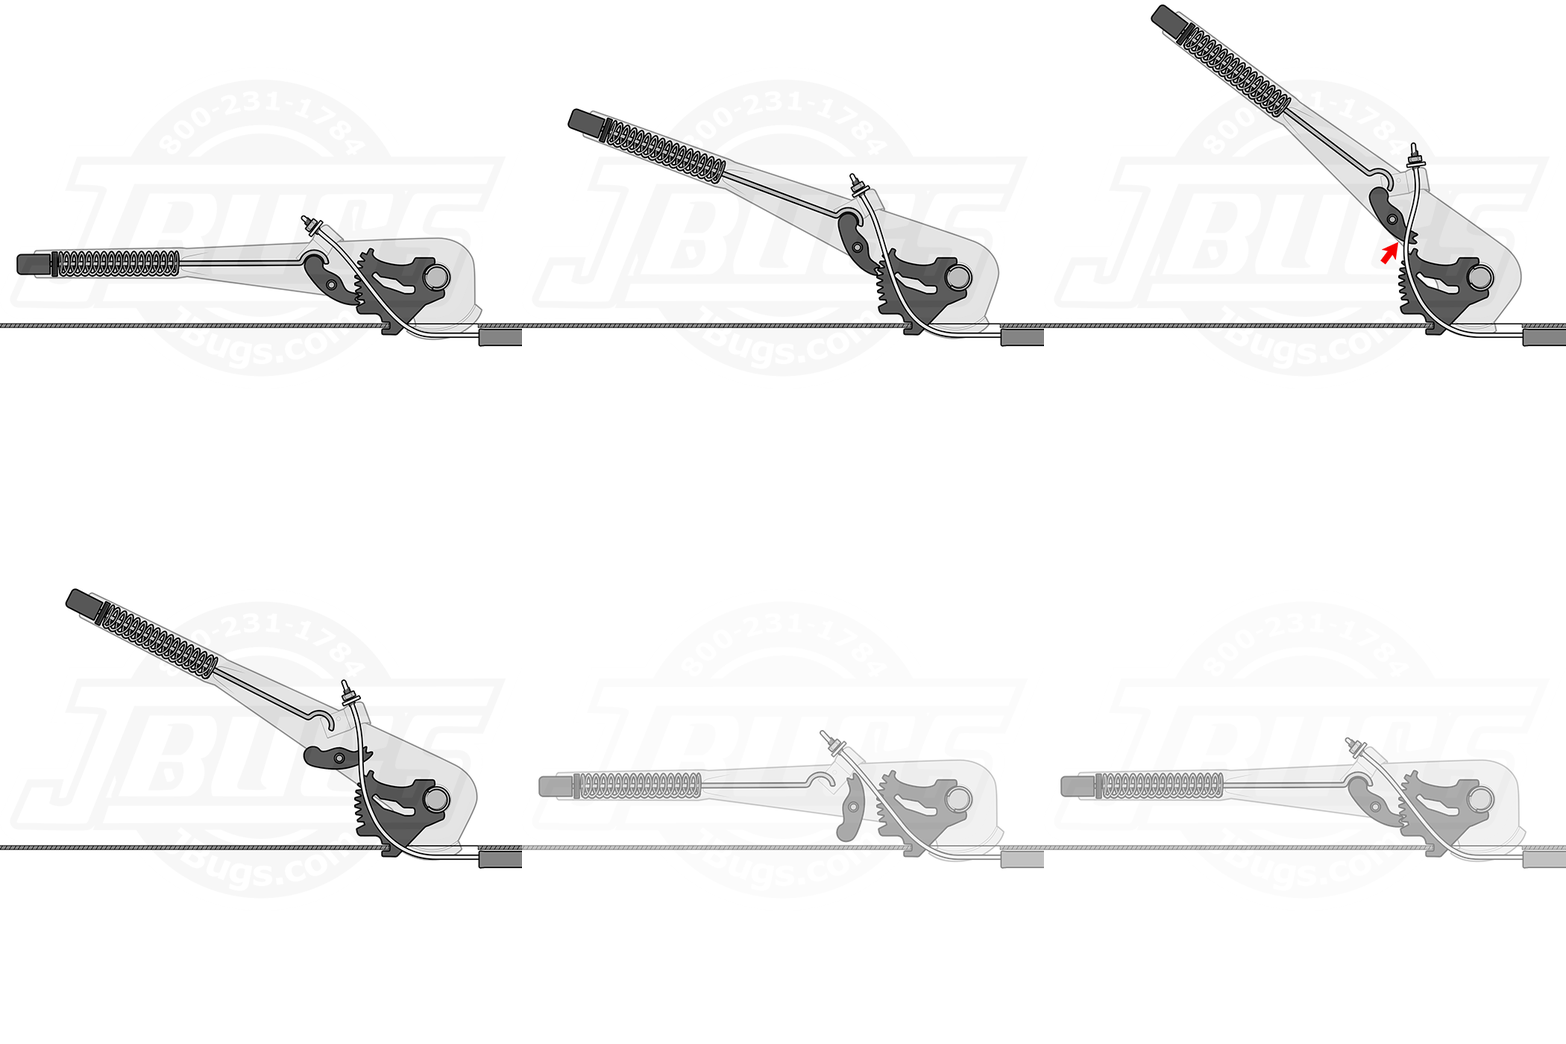
Over Extend Lever:
If the handbrake lever is pulled past its normal travel, the pawl can ride over or slip out of alignment with the ratchet plate. When this happens, the lever will not lock in place, and the parking brake will not hold the vehicle. Over-extension can also stress the return spring and linkage, leading to poor engagement. In most cases, you'll need to disassemble the hand brake lever to restore proper function.
VW Hand Brake Parking Brake Animation
Resetting a VW parking brake handle when the pawl has popped out is a common issue. Here's how you can fix it:

1. Tools You’ll Need:
• 10mm Wrench
• 10mm Deep well socket
• 1/4" Drive Ratchet
• Small flat blade screwdriver
2. Preparation:
• Ensure the vehicle is parked on a flat surface and the wheels are blocked for safety.
3. Adjust the Cables:
• Loosen the lock nuts on the parking brake cables beneath the handle using a 10mm wrench or socket. This will provide the slack necessary to work on the handle.
4. Remove the Handle:
• Pull back the brake boot to access the handle and its components.
• Remove the spring clip or snap ring from the pivot pin of the handle using a small flat blade screwdriver.
• Carefully pull out the pivot pin and then the handle itself.
5. Reset the Pawl:
• Examine "cat's paw" in the handle assembly. Rotate it, so the rounded edge is at top, and the teeth are at the bottom facing the ratchet mechanism.
• Gently adjust the pawl rod to reset it above the pawl correctly. You might need to manipulate the pawl and pushrod until they engage properly.
6. Reinstall the Handle:
• Slide the handle back into place. Ensure that the ratchet mechanism is set to a stationary position by notching into the chassis.
• Insert the lever pivot pin and secure it with the spring clip or snap ring.
• Pull the parking brake cables back to their original position through their ramps.
7. Tighten the Cables:
• Reinstall the equalizer bar, ensuring it seats correctly over the cable nuts.
• Tighten the lock nuts on the cables to the appropriate tension.
8. Test the Brake:
• Test the parking brake lever to ensure it engages and releases smoothly without overextending.


The following information is courtesy of Rob and Dave's Aircooled VW Resources. **Website is no longer hosted.

DISCLAIMER: Rob and Dave have prepared this information from their own experiences. They have not assumed any specialized mechanical knowledge, but they DO assume that anyone using this information has at least some basic mechanical ability.

We hope you find this information useful, but we don't take any responsibility for anything which happens to you, other people, your VW or any other property or goods resulting from your use of this material.

Feel free to print off any of this information for your own use. If you intend to link this material to another site, reprint it, or in any other way redistribute it, please leave the information complete, including this disclaimer section, and provide a link to this Rob and Dave's VW resources.


Note: The hand brake should be adjusted whenever the rear brake shoes have worn enough to allow you to raise the lever five clicks without noticeable braking action. It is essential that the cables be adjusted to that the "compensating" lever (immediately below the adjusting nuts on the hand brake) is horizontal when the hand brake is applied. If the rear brake shoes are adjusted properly but the compensating lever isn't horizontal after adjustment of the hand brake cables, one cable may be stretched and, if left in service, will eventually break. If only one of the cables is broken or damaged, you don't have to replace the other one, but one cable will be more stretched than the other. It's easier to adjust two cables of the same age, so we recommend replacing both cables when one brakes.

Rob & Daves' Hand Brake Adjustment Procedure
  1. Jack up the rear of the car and place it on jack stands.
  2. Adjust the rear brakes if necessary.
  3. Go to the front of the car and remove the rubber boot from the brake handle.
  4. Use two 10mm wrenches to loosen the top nut on the top of the cable. Hold the cable from turning with the screwdriver in the slot. Loosen both sides.
  5. Pull the lever up three clicks.
  6. Turn the bottom nuts down on the cables until you can just turn each rear wheel by hand. Braking effort must be equal on both sides.
  7. When you are four notches on the handle, the wheels should be stopped and you should be unable to turn the wheels by hand.
  8. Release the brake again and make sure that the wheels turn freely and that they are "balanced" -- both stop at the same time. Readjust as necessary.
  9. When the brakes are tight at four notches and the lever and free when the lever is released, you have them right.
  10. When they are right, run the top nuts down on the bottom nuts. Hold the bottom one with one wrench while you tighten the top one--this locks the adjustment.
  11. Reinstall the rubber boot.
  12. Lower the car to the floor.
Rob & Daves' Hand Brake Cable Replacement Procedure
  1. Block the front wheels to prevent movement.
  2. Fully release the hand brake.
  3. Back off the brake adjusters slightly.
  4. WITH THE REAR WHEELS STILL ON THE GROUND, remove the cotter pin from the castle nut on the rear wheel shaft. Mark both the nut and the end of the axle where the cotter pin went thru so you can torque the nut to the same place when replacing it. Break the rear axle nut loose with a 36mm (1-7/16" socket) on a 3/4-inch drive breaker bar and "cheater" -- a length of pipe about four feet long to slip over the braker bar to give more torque. Remove the castle nut, then raise the car.
  5. WARNING -- Loosen the two castle nuts (one on each side) while the car is on the ground. The castle nut should have at least 217 ft-lbs of torque on it -- the leverage needed to remove it is enough to topple a car off the jackstands.

    Note: If you car is equipped with spinners (like ours is), the castle nuts will not be accessible with the wheels on the car. After removing the rear wheels, we had success with lowering the brake drums down onto large blocks of wood and firmly appling the parking brake. This plus the weight of the car on the wooden block held the brake drums in place while we removed and later replaced the castle nuts.

  6. Loosen the wheel lug bolts/nuts and raise the rear of the car and place it securely on jack stands.
  7. Remove the wheel lug bolts/nuts and remove the rear wheels.
  8. Back off the brake adjusting stars, then remove the brake drum from the splines in the rear wheel shaft. You now have the inner workings of the rear brakes exposed.
  9. Remove the rubber boot from the brake handle.
  10. Use two 10mm wrenches to loosen and remove the adjusting nuts on the top of the cable (two on each side). Hold the cable from turning with the screwdriver in the slot.
  11. Remove the compensating lever.
  12. Return to the rear of the car and disconnect the bolt that attaches the hand brake cable to the backing plate (on the rear of the backing plate).
  13. Note: If you're replacing both cables, do one cable at a time so you'll have the other cable as a reassembly guide.

  14. Pull the rear end of the cable and cable guide and cable through the backing plate and pull the front end of the cabale out of the guide tube.
  15. Clean the cable and guide tube.
  16. Note: on cars manfactured since August 1, 1966, the rear wheel track is wider. These models have longer hand brake cables. Compare the lengths of the new cable and the old cable to make sure you have the right replacement cable.

  17. Lubricate the cable with multi-purpose grease.
  18. Thread the front end of the cable through the guide tube and the rear end of the cable through the brake backing plate.
  19. Install the brake shoes and attach the hand brake cable to the lever on the rear shoe.
  20. Loosely install the cable adjusting nut and locknut at the hand brake lever.
  21. If you are replacing both cables, repeat the foregoing for the other cable.
  22. Reinstall the brake drum.

    Note: Since there are no bearing in the rear brake drums, installation is straightforward. Simply slip the new drum onto the splines in the rear wheel shaft. If you have The only problem you may encounter is getting the new drum over the new shoes. Back off the brake adjusting stars completely to provide clearance.

  23. Reinstall the wheels.
  24. Adjust the brakes according to the Brake Adjustment procedure.
  25. Adjust the hand brake cable in accordance with the procedure above.
  26. Carefully lower the rear of the car to the ground.